
Bonsai Pruning Workflow Capture / RHS: Bonsai / Nov 19, 2026
From First Cut to Canopy Check: Recording Bonsai with R9
Use an R9 egocentric camera with IMU to record bonsai shoot selection, two-handed pruning, pot turns and canopy review with video and shared timing.
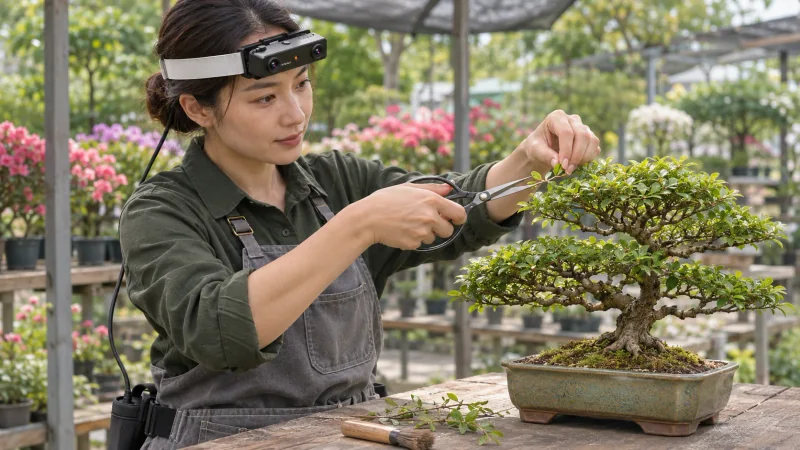
How can an egocentric camera with IMU record a complete bonsai pruning session?
- Keep shoot selection, supporting-hand placement, scissor cuts, pot turns and final canopy inspection in their performed order.
- Use R9 global-shutter video, an adjustable camera angle and a six-axis IMU above 200 Hz with shared-clock and global-timestamp support.
- Have a reviewer label crown sections and action intervals against the saved recording timeline.
An egocentric camera with IMU can preserve the pruning practitioner's view from the first selected shoot to the final bonsai canopy inspection. In this nursery recording plan, EGO R9 follows the hands separating foliage, positioning scissors, trimming and collecting cuttings. Its global-shutter video accompanies a six-axis inertial record and timing information, giving a reviewer the demonstrated sequence together with the movement of the head-mounted device.
Choose the bonsai session to record
The Royal Horticultural Society's bonsai guide explains that branch pruning depends on the tree species and that established specimens receive repeated trimming to maintain their form. Use the practitioner's selected maintenance session as the subject. Note the specimen, intended canopy areas and the work planned for that day before the first cut; these decisions belong to the gardener.
Set the R9 view at the nursery bench
At the nursery bench, put on the R9 head strap and adjust the camera angle while adopting the working posture. Bring the scissors and the hand supporting a twig into view, then rehearse looking into the crown and toward the clipping tray. With the documented 120-degree lens, verify the actual framing of the hands, branch and pot during those movements.
Save the recording configuration with the take
Choose the documented 1080P, 30 FPS recording configuration for this take and save the session identifier with those settings. Check a short sample showing a shoot being presented and the scissors opening beside it. Review the sample before continuing, keeping the full maintenance session under one identifier so its preparation, trimming and final inspection remain connected.
Retain the approach to the first shoot
Start the main recording while the practitioner examines the bonsai's front. Retain the pause in which a shoot is selected, the supporting hand moves a leaf aside and the scissor hand approaches. Keep the selected shoot visible before the blades close. This lead-in lets a reviewer see which part of the crown the practitioner chose and how both hands reached the cutting position.
Follow the trim through the blades closing, the clipping separating and the hands returning to the canopy. R9's global shutter records the visible arrangement of branch, fingers and tool as the practitioner works. Keep the surrounding video, including a clipping placed in the tray or held while the next shoot is examined, so the hand sequence stays intelligible during later review.
Follow crown sections and pot turns
Continue as the practitioner works through the chosen crown sections. Include changes between holding a twig, lifting foliage for access and bringing the scissors back into position. When the pot is turned, retain the turn itself and the first inspection from the new orientation. Give each orientation a simple name in the session notes, such as front, side and rear.
Associate head-mounted motion with the video
The R9 IMU samples at a rate above 200 Hz. Looking down into the pot and then across the upper crown moves the head-worn device, producing an inertial record alongside the video. Keep this distinction clear in the session description: the image shows the visible handwork, while the inertial samples belong to the camera wearer's head-mounted unit.
R9 supports a shared clock and global timestamps. Preserve that timing when a reviewer selects the interval around a pot turn, a change of crown section or a return from the clipping tray. Record the chosen interval boundaries in the review notes, allowing the visible action and its accompanying inertial segment to be retrieved together from the original session.
Record the final canopy check and cleanup
After the last trim, keep recording as the practitioner checks the silhouette from the selected viewpoints. Include any final repositioning of a leaf or inspection of a recently cut shoot, followed by the scissors being set down. Finish with cuttings removed from the pot surface and bench. That closing sequence shows how the maintenance task reaches its actual stopping point.
Make a pruning index through human review
Build a reviewer-written index after watching the recording: specimen identifier, crown section, orientation, selected shoot, scissors approach, cut completed and clipping cleared. Attach time intervals rather than replacing the full take with disconnected highlights. Keep the R9 recording settings and timing record with the indexed session so another reviewer can return to the same visible sequence.
What does an egocentric camera with IMU capture at the bonsai bench?
For a bonsai pruning session, an R9 egocentric camera with IMU combines first-person global-shutter video with a six-axis inertial stream above 200 Hz. Its adjustable camera angle helps set the practitioner's working view. Review the video for the demonstrated branch and hand positions, then use the associated timing when locating the corresponding portion of the inertial record.
How can both hands and the sequence between cuts be reviewed?
Retain the practitioner selecting a shoot, arranging the supporting hand, bringing the scissors to the branch and clearing the clipping. Include the hand changes between cuts and the turns of the pot. A reviewer can mark these transitions on the complete recording, preserving how one pruning action leads into the next crown section.
How should different sides of the bonsai be indexed?
Name the specimen and the chosen orientation in the session notes, then add each pot turn as a time interval during review. Use R9's shared-clock and global-timestamp information with those intervals. The resulting index links the practitioner's changing view to the demonstrated pruning sequence through human observation and the saved recording timeline.